An Impressionistic "En Plein Aire" Demonstration...
It has often been said that "art imitates life and life imitates art"... and there is valid truth to that statement. Life is a progression, a maturing movement, and is often... not what it seems. Ones art talent naturally is a progression (at least hopefully) that matures with time, practice, and experience. Artwork, in many cases, through technique takes on a progression through stages and matures to completion. What about those in between stages where things aren't as they seem?... a stage that can actually be UGLY! Just like in life... patience, perserverance, and hard work produce masterpieces that we never dreamed of. I often think of God in this way... he has so much patience with us, his artwork... He molds and fashions us into his masterpieces.
This next painting is a great visual example of the statements listed above. Another one done "en plein aire" on location in the mountains of North Carolina. Once again, Tami dropped me off, this time in a field where I had been observing these haystacks all week. In the Blue Ridge Mountains near Boone, NC, the open fields are covered with these haystacks (haybales is probably a better name) in the early summer... a beautiful site. I wanted to try and paint them similar to Monet's impressionistic style since we both seemed to have a thing for haystacks.
Stage 1...
Find a spot similar to Monet's in composition.
Stage 2...
A simple charcoal sketch for composition.
Stage 3...
I blocked in areas with the complimentary color as an under-painting per say to the colors I planned on using. Nothing fancy... used a brush and a palette knife. You could call this the UGLY stage.
Stage 4...Painted sky and tree line with small dabs using a paint brush. Painted the stacks and field with short linear strokes with a small palette knife.
Stage 5...
Refined and refined some more... and at last finished in about 2 1/2 hours time.
"Haystacks near Todd, NC", 12"x9" Oil on Canvas Board, "en plein air", 2005. Honorable Mention, Onslow Art Society Spring Show 2006.
Close-up showing brushwork.
OK... looks a little more Van Gogh-ish than Monet-ish.... but.... what the hay!
Bernie
Orginally posted 11/2005 on my Art Journal blog...
Thursday, April 16, 2009
Masters Study... Nicolai Fechin... A demonstration on loose brushwork by Bernie Rosage Jr.
"An artist should work every day with what is at hand" ~ Nicolai Fechin
For 74 years, the artist Nicolai Fechin (1881-1955) carried in his mind's eye striking visual images of two disparate lands: his birthplace in Kazan, Russia and the American Southwest. Images from each country fueled his artistic gifts, so that a rich bounty of paintings, carvings, sculptures, and designs poured forth from his imagination.
"Fechin was known as the living old master ... an artist's artist. Others called him the Michaelangelo of our time.His talents in so many diverse disciplines was unique indeed --- a master of painting, drawing, sculpture, architecture, woodcarving and ceramics.What his eyes saw and his hands touched, became a creative experience." ~ Mary N. Balcomb, Fechin's author.
Nicolai Fechin: Painter, Sculptor, Builder.
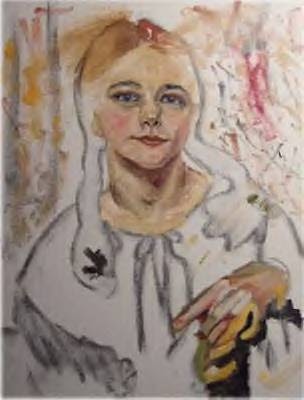
I just finished a couple of paintings that I plan to give as Christmas presents and will share with you after Christmas as not to give away any surprises! Right now I am working on a cover painting by this great artist titled "Eya". It is a painting Fechin did of his daughter in 1933. I will share the progress of my painting in stages as a WIP (Work In Progress).
"Eya"... Original by Fechin (1933)
After the death of Nicolai Fechin, his former wife and daughter (Eya) lived in the family home in Taos. In 1981, Eya Fechin Branham spearheaded the formation of the Fechin Institute, a non-profit, educational organization headquartered in the house. Following Eya’s death many years later, the house, studio and offices were sold to the Taos Art Museum.
For this painting I am using a wet in wet method. I simply am applying the paint without any medium onto a primed canvas. This method is nothing like the glazing demo I shared with my William Bouguereau cover where color is built up in stages. My goal is to loosen my brush strokes for a more painterly look. I chose to do a cropped version of Fechin's "Eya".
Stage 1... fixed vine charcoal sketch on canvas.
Stage 2... began to block in color.
Stage 3... began to add detail to her eyes.
Stage 4... blocked in color on hands and added more color to face.
Stage 5... Modeled color more on face and began hair.
Close up...
My palette for this painting: Titanium White, Ivory Black, Raw Umber, Burnt Umber, Ultramarine Blue, Sap Green, Alizarin Crimson, Indian Red, Cadmium Red, Cadmium Yellow, Cadmium Orange, Burnt Sienna, Yellow Ochre, Dioxazine Purple, and Naples Yellow.
Stage 6... started blocking in background color.
Stage 7... continued work on the background and thinned that chunky neck a bit..
Stage 8... worked on hair.
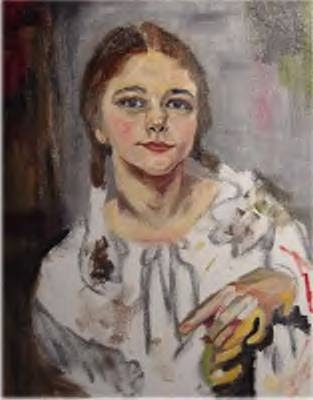
Stage 9... worked on Eya's blouse and refined background... and... FINISHED!
"Eya" after Fechin (cropped)... 14"x11" Oil on Stretched Canvas, 2005. Slavin's Gallery Award 2006 Onslow Art Society Spring Show.
I really enjoyed working in the style of this one... wet-in-wet, thick, and loose! This was an excellent master to help me loosen up my brush strokes and practice scumbling. I want to try this style with one of my family members. Completed this in three sessions with about six hours total painting time.
I think I am finally starting to loosen up...
My cover of Fechin’s “Eya”... from start to finish.
My palette for this painting: Titanium White, Ivory Black, Raw Umber, Burnt Umber, Ultramarine Blue, Sap Green, Alizarin Crimson, Indian Red, Cadmium Red, Cadmium Yellow, Cadmium Orange, Burnt Sienna, Yellow Ochre, Dioxazine Purple, and Naples Yellow.
First I made a simple vine charcoal sketch on primed canvas and spayed it with fixative to set it. Then I basically started painting from the center (face) out with the exception of doing the hands. I began by blocking in the colors of the face and neck. My skin tone palette consisted of two different mixtures of three tones: 1) Burnt sienna mixed with titanium white...2) Yellow ochre mixed with titanium white. The burnt sienna/white was used more in the redder fleshy areas like the cheeks and the ochre/white was used more on the flat thin areas like the forehead. I made various tones of these two mixtures adding a tad of cad red into the rosy/blood areas and a tad cad yellow on the forehead. My shadows consisted of various mixtures of alizarin crimson, sap green, and a little ultramarine blue. In the warmer shadows I let the alizarin dominate and in the cooler areas I used the sap green and ultramarine. The lips where mostly Indian red with some alizarin. The whites of the eyes consisted of titanium white mixed into one of my flesh color mixtures... the whites of the eyes are never pure white. Working from the center out I blocked some strong under colors to emulate the shapes of the masses then I began to detail the eyes and work out from there... finishing those areas and moving on to the next. Following Fechin’s style... The face (particularly the eyes) is the most detailed/refined area of the entire painting... everything else is carefree and expressive. With that in mind I simply did the hands by observing and painting the shapes of color I saw. The same can be said for the background and Eya’s blouse. The hands consisted mostly of my skin tone mixtures and sap green, burnt sienna, Indian red, cad red, cad yellow, white, yellow ochre and alizarin crimson. Eya’s hair consisted mostly of burnt and raw umber, gray (ivory black/titanium white mix), burnt sienna, ivory black, and Naples yellow. For Eya’s blouse... you can really see the wide array of color used plus the thick bold strokes of paint. If you look at some of my progression pictures you will notice that I wiped excess paint from my brush any where on the canvas... this made some neat under tones when I painted the background in. For the background... mostly gray... I used ivory black, white, yellow ochre, sap green, alizarin, and dioxazine purple. I varied my stroke directions and scumbled (dragging dry paint over areas allowing the color underneath to show through) colors in areas. I really enjoyed this method. I worked totally wet-in-wet with no mediums. I used a big #10 flat bristle brush for most of the background. A #4 flat synthetic sable was used for most of the work along with some small flat hog bristle brushes for texture and a small flat for detail work. I painted the piece (11"x14") in three sessions with approximately six total painting hours involved.
As always... your comments are desired and appreciated... Thanks for looking...
Bernie
Originally posted 12/2005 on my Art Journal blog...
For 74 years, the artist Nicolai Fechin (1881-1955) carried in his mind's eye striking visual images of two disparate lands: his birthplace in Kazan, Russia and the American Southwest. Images from each country fueled his artistic gifts, so that a rich bounty of paintings, carvings, sculptures, and designs poured forth from his imagination.
"Fechin was known as the living old master ... an artist's artist. Others called him the Michaelangelo of our time.His talents in so many diverse disciplines was unique indeed --- a master of painting, drawing, sculpture, architecture, woodcarving and ceramics.What his eyes saw and his hands touched, became a creative experience." ~ Mary N. Balcomb, Fechin's author.
Nicolai Fechin: Painter, Sculptor, Builder.
I just finished a couple of paintings that I plan to give as Christmas presents and will share with you after Christmas as not to give away any surprises! Right now I am working on a cover painting by this great artist titled "Eya". It is a painting Fechin did of his daughter in 1933. I will share the progress of my painting in stages as a WIP (Work In Progress).
"Eya"... Original by Fechin (1933)
After the death of Nicolai Fechin, his former wife and daughter (Eya) lived in the family home in Taos. In 1981, Eya Fechin Branham spearheaded the formation of the Fechin Institute, a non-profit, educational organization headquartered in the house. Following Eya’s death many years later, the house, studio and offices were sold to the Taos Art Museum.
For this painting I am using a wet in wet method. I simply am applying the paint without any medium onto a primed canvas. This method is nothing like the glazing demo I shared with my William Bouguereau cover where color is built up in stages. My goal is to loosen my brush strokes for a more painterly look. I chose to do a cropped version of Fechin's "Eya".
Stage 1... fixed vine charcoal sketch on canvas.
Stage 2... began to block in color.
Stage 3... began to add detail to her eyes.
Stage 4... blocked in color on hands and added more color to face.
Stage 5... Modeled color more on face and began hair.
Close up...
My palette for this painting: Titanium White, Ivory Black, Raw Umber, Burnt Umber, Ultramarine Blue, Sap Green, Alizarin Crimson, Indian Red, Cadmium Red, Cadmium Yellow, Cadmium Orange, Burnt Sienna, Yellow Ochre, Dioxazine Purple, and Naples Yellow.
Stage 6... started blocking in background color.
Stage 7... continued work on the background and thinned that chunky neck a bit..
Stage 8... worked on hair.
Stage 9... worked on Eya's blouse and refined background... and... FINISHED!
"Eya" after Fechin (cropped)... 14"x11" Oil on Stretched Canvas, 2005. Slavin's Gallery Award 2006 Onslow Art Society Spring Show.
I really enjoyed working in the style of this one... wet-in-wet, thick, and loose! This was an excellent master to help me loosen up my brush strokes and practice scumbling. I want to try this style with one of my family members. Completed this in three sessions with about six hours total painting time.
I think I am finally starting to loosen up...
My cover of Fechin’s “Eya”... from start to finish.
My palette for this painting: Titanium White, Ivory Black, Raw Umber, Burnt Umber, Ultramarine Blue, Sap Green, Alizarin Crimson, Indian Red, Cadmium Red, Cadmium Yellow, Cadmium Orange, Burnt Sienna, Yellow Ochre, Dioxazine Purple, and Naples Yellow.
First I made a simple vine charcoal sketch on primed canvas and spayed it with fixative to set it. Then I basically started painting from the center (face) out with the exception of doing the hands. I began by blocking in the colors of the face and neck. My skin tone palette consisted of two different mixtures of three tones: 1) Burnt sienna mixed with titanium white...2) Yellow ochre mixed with titanium white. The burnt sienna/white was used more in the redder fleshy areas like the cheeks and the ochre/white was used more on the flat thin areas like the forehead. I made various tones of these two mixtures adding a tad of cad red into the rosy/blood areas and a tad cad yellow on the forehead. My shadows consisted of various mixtures of alizarin crimson, sap green, and a little ultramarine blue. In the warmer shadows I let the alizarin dominate and in the cooler areas I used the sap green and ultramarine. The lips where mostly Indian red with some alizarin. The whites of the eyes consisted of titanium white mixed into one of my flesh color mixtures... the whites of the eyes are never pure white. Working from the center out I blocked some strong under colors to emulate the shapes of the masses then I began to detail the eyes and work out from there... finishing those areas and moving on to the next. Following Fechin’s style... The face (particularly the eyes) is the most detailed/refined area of the entire painting... everything else is carefree and expressive. With that in mind I simply did the hands by observing and painting the shapes of color I saw. The same can be said for the background and Eya’s blouse. The hands consisted mostly of my skin tone mixtures and sap green, burnt sienna, Indian red, cad red, cad yellow, white, yellow ochre and alizarin crimson. Eya’s hair consisted mostly of burnt and raw umber, gray (ivory black/titanium white mix), burnt sienna, ivory black, and Naples yellow. For Eya’s blouse... you can really see the wide array of color used plus the thick bold strokes of paint. If you look at some of my progression pictures you will notice that I wiped excess paint from my brush any where on the canvas... this made some neat under tones when I painted the background in. For the background... mostly gray... I used ivory black, white, yellow ochre, sap green, alizarin, and dioxazine purple. I varied my stroke directions and scumbled (dragging dry paint over areas allowing the color underneath to show through) colors in areas. I really enjoyed this method. I worked totally wet-in-wet with no mediums. I used a big #10 flat bristle brush for most of the background. A #4 flat synthetic sable was used for most of the work along with some small flat hog bristle brushes for texture and a small flat for detail work. I painted the piece (11"x14") in three sessions with approximately six total painting hours involved.
As always... your comments are desired and appreciated... Thanks for looking...
Bernie
Originally posted 12/2005 on my Art Journal blog...
Labels:
Art Demonstration,
Bernie Rosage Jr,
Nicolai Fechin
Masters Study... William Bouguereau... A Demonstration in the Technique of Glazing by Bernie Rosage Jr.
A Demonstration in the Technique of Glazing...
My favorite artist is John Singer Sargent... but... William Bouguereau runs a close second! The way he painted the human figure is remarkable... his palette colors superb... especially his rendering of skin tones. A lot can be learned from studying this great artist. This painting was a big challenge for me... not only in size at 30"x20" but in the technique of glazing. I briefly mentioned glazing in my Vermeer conversation... It is the layering of color... one on top of another... building up color per say to get the desired and final results. It is a slow process because one layer has to completely dry before another is added. When I finally finished this painting I had 50 hours time devoted to painting alone not counting planning, research, and drying time. It was worth it because it was a special Christmas gift for my wife, Tami, last year.
Adolphe-William Bouguereau (1825-1905)
The name of the painting is L'Amour et Psyche, enfants (Translated title: Cupid and Psyche as Children.) and it was painted in 1889.

L'Amour et Psyche, enfants Original.
Greek legends, Cupid and Psyche, share an interesting love story as written by Kara Ross...
"The story of Cupid and Psyche was one of Bouguereau’s favorite myths. He painted several works inspired from this legend, such as The Rapture of Psyche, Psyche and Cupid, and Psyche. The myth of Cupid and Phsyche first appears written in The Golden Ass of Lucius Apuleius in the 2nd century AD. In the story, Psyche is a beautiful princess of whom the goddess Venus is jealous. In her rage she orders her son cupid to make Psyche fall in love with a monster, but Cupid falls in love with her himself. After several trials Cupid and Psyche make their plea to the gods who turn Psyche into an immortal and allow them to be married in heaven (British Library). In this painting Bouguereau was inspired to paint the two lovers together as children. Demonstrating that fate its self had a hand in there meeting. They were born to be together. The subtle paint handling captures the children’s innocence and illustrates to the viewer that Cupid's original attraction to Psyche was not purely physical, but also platonic, for the innocence of childhood does not allow for anything else. You cannot have true love without also having a mutual trust and respect, and a relaxed and enduring companionship between lovers. Cupid and Psyche’s union then is not just physical: they are soul mates and compliment each other eternally."
On with the painting...
I plan to share some technical info plus show you various stages to help you better understand the technique of glazing.

Stage 1... Primed canvas (30"x20") with several coats of gessoe. Last coat included a paynes gray/ultramarine tint. Sketched in charcoal and fixed.

Stage 2... Blocked in background with paynes gray, ultramarine blue, and titanium white.

Stage 3... I let the background dry then began a grisaille (grayish) underpainting of the figures with ivory black and titanium white. The ivory black gives a slight blue cast which I thought would be appropriate for those great Bouguereau skin tones that have a hint of blue in them. I will be working on the grisaille for the next several updates... a slow process for me with the size of this one.


About 13 hours into it at this point...

Stage 4... Applied my first color glaze... a mixture of Flake White and Raw Sienna over the whole skin area. I am using Liquin as my mixing medium. Liquin is a thinning medium that also accelerates drying time for oils... approximately 24 hours drying time per layer with the Liquin. It is important that each layer be completely dry before applying the next.
My first application of color would be super thin, and I would apply color broadly to "tint" the grisaille underpainting, so that it actually takes on the appearance of a hand-tinted sepia photograph. I'd use, perhaps, one "flesh" hue, that I had carefully mixed, and spread it (scrub it) thinly over the entire flesh area. This layer is so thin that the grisaille underpainting shows through, leaving the tones of the grisaille more or less intact.

Stage 5... I have added a couple glazes over the entire skin area with a mix of burnt sienna/yellow ochre/cad red/titanium white. A layer of burnt umber was applied to the hair and ultra marine to the fabric. Finished the wings.

Stage 6... My last layer of glazing which consists of: Skin tones: yellow ochre, cad red, titanium white, ultramarine blue... Shadow areas: ultramarine blue, sap green, burnt umber, indian red. I work the various colors in (using Liquin as my mixing medium) using the under painting as a guide. Now I simply have to cover Cupid and Psyche in this slow manner (approx 23 hours into this one so far).
Close ups of knee at various stages mentioned to give you a better visual idea...


I basically kept working in this manner and with this palette until the subjects were complete. Notice the richness in various colors on the last close up... the glazing gives work a translucent appearance allowing many colors to show through. Once the skin tones were done... I finished the hair and the fabric in the same manner.
Some important tips about glazing by my dear friend and mentor Bill Martin...
The first "secret" is that glazing consists of full bodied paint applied.... thinly, with no brush strokes apparent.
The second "secret" is that as you approach the final layers, the paint is often applied more thickly and opaquely, especially in the lighter color tints and highlight areas.
The third "secret" is that building layer upon layer, in this thin manner, creates a depth that is quite believable, and continues to look better after each glaze.
The fourth "secret" is that you always know it's time to call an end when you can no longer step back from your painting and say, "Yeah! That really improved it!"
Have fun with your glazing!
Your friend in art, Bill.
The evolution of this painting...

The grand finale... my completed work....

"L'Amour et Psyche, enfants" Translated title: Cupid and Psyche as Children after William Bouguereau, 30"x20" Oil on Stretched Canvas, 2004.
The greatest part... Tami loved her Christmas present...

Thanks for dropping by...
Bernie
Originally posted 12/2005 on my Art Journal blog...
My favorite artist is John Singer Sargent... but... William Bouguereau runs a close second! The way he painted the human figure is remarkable... his palette colors superb... especially his rendering of skin tones. A lot can be learned from studying this great artist. This painting was a big challenge for me... not only in size at 30"x20" but in the technique of glazing. I briefly mentioned glazing in my Vermeer conversation... It is the layering of color... one on top of another... building up color per say to get the desired and final results. It is a slow process because one layer has to completely dry before another is added. When I finally finished this painting I had 50 hours time devoted to painting alone not counting planning, research, and drying time. It was worth it because it was a special Christmas gift for my wife, Tami, last year.
Adolphe-William Bouguereau (1825-1905)
The name of the painting is L'Amour et Psyche, enfants (Translated title: Cupid and Psyche as Children.) and it was painted in 1889.

L'Amour et Psyche, enfants Original.
Greek legends, Cupid and Psyche, share an interesting love story as written by Kara Ross...
"The story of Cupid and Psyche was one of Bouguereau’s favorite myths. He painted several works inspired from this legend, such as The Rapture of Psyche, Psyche and Cupid, and Psyche. The myth of Cupid and Phsyche first appears written in The Golden Ass of Lucius Apuleius in the 2nd century AD. In the story, Psyche is a beautiful princess of whom the goddess Venus is jealous. In her rage she orders her son cupid to make Psyche fall in love with a monster, but Cupid falls in love with her himself. After several trials Cupid and Psyche make their plea to the gods who turn Psyche into an immortal and allow them to be married in heaven (British Library). In this painting Bouguereau was inspired to paint the two lovers together as children. Demonstrating that fate its self had a hand in there meeting. They were born to be together. The subtle paint handling captures the children’s innocence and illustrates to the viewer that Cupid's original attraction to Psyche was not purely physical, but also platonic, for the innocence of childhood does not allow for anything else. You cannot have true love without also having a mutual trust and respect, and a relaxed and enduring companionship between lovers. Cupid and Psyche’s union then is not just physical: they are soul mates and compliment each other eternally."
On with the painting...
I plan to share some technical info plus show you various stages to help you better understand the technique of glazing.

Stage 1... Primed canvas (30"x20") with several coats of gessoe. Last coat included a paynes gray/ultramarine tint. Sketched in charcoal and fixed.

Stage 2... Blocked in background with paynes gray, ultramarine blue, and titanium white.

Stage 3... I let the background dry then began a grisaille (grayish) underpainting of the figures with ivory black and titanium white. The ivory black gives a slight blue cast which I thought would be appropriate for those great Bouguereau skin tones that have a hint of blue in them. I will be working on the grisaille for the next several updates... a slow process for me with the size of this one.


About 13 hours into it at this point...

Stage 4... Applied my first color glaze... a mixture of Flake White and Raw Sienna over the whole skin area. I am using Liquin as my mixing medium. Liquin is a thinning medium that also accelerates drying time for oils... approximately 24 hours drying time per layer with the Liquin. It is important that each layer be completely dry before applying the next.
My first application of color would be super thin, and I would apply color broadly to "tint" the grisaille underpainting, so that it actually takes on the appearance of a hand-tinted sepia photograph. I'd use, perhaps, one "flesh" hue, that I had carefully mixed, and spread it (scrub it) thinly over the entire flesh area. This layer is so thin that the grisaille underpainting shows through, leaving the tones of the grisaille more or less intact.

Stage 5... I have added a couple glazes over the entire skin area with a mix of burnt sienna/yellow ochre/cad red/titanium white. A layer of burnt umber was applied to the hair and ultra marine to the fabric. Finished the wings.

Stage 6... My last layer of glazing which consists of: Skin tones: yellow ochre, cad red, titanium white, ultramarine blue... Shadow areas: ultramarine blue, sap green, burnt umber, indian red. I work the various colors in (using Liquin as my mixing medium) using the under painting as a guide. Now I simply have to cover Cupid and Psyche in this slow manner (approx 23 hours into this one so far).
Close ups of knee at various stages mentioned to give you a better visual idea...


I basically kept working in this manner and with this palette until the subjects were complete. Notice the richness in various colors on the last close up... the glazing gives work a translucent appearance allowing many colors to show through. Once the skin tones were done... I finished the hair and the fabric in the same manner.
Some important tips about glazing by my dear friend and mentor Bill Martin...
The first "secret" is that glazing consists of full bodied paint applied.... thinly, with no brush strokes apparent.
The second "secret" is that as you approach the final layers, the paint is often applied more thickly and opaquely, especially in the lighter color tints and highlight areas.
The third "secret" is that building layer upon layer, in this thin manner, creates a depth that is quite believable, and continues to look better after each glaze.
The fourth "secret" is that you always know it's time to call an end when you can no longer step back from your painting and say, "Yeah! That really improved it!"
Have fun with your glazing!
Your friend in art, Bill.
The evolution of this painting...

The grand finale... my completed work....

"L'Amour et Psyche, enfants" Translated title: Cupid and Psyche as Children after William Bouguereau, 30"x20" Oil on Stretched Canvas, 2004.
The greatest part... Tami loved her Christmas present...

Thanks for dropping by...
Bernie
Originally posted 12/2005 on my Art Journal blog...
Labels:
Art Demonstration,
Bernie Rosage Jr,
Plein Air Demo
Friday, March 06, 2009
Sneak Peek from the Enchanting Ireland Series...
Here's a sneak peek from the Enchanting Ireland Series that I have been working on for the past several months. Read the story behind this painting and see the progress of the series HERE...
Click on image to enlarge.
.jpg)
"Sean Dempsey and the Rare Auld Times" by Bernie Rosage Jr... 30x24" Oil on Gallery Wrapped Canvas
NOTE: Bernie is currently working on a series of paintings inspired from a recent trip to Ireland. The series is titled "Enchanting Ireland" and will be on exhibit in August 2009 at the Baysden Gallery in Jacksonville, NC and in September 2009 at the New Bern Artworks Gallery in New Bern, NC. Read about his adventures and see the progress of this series at Enchanting Ireland.
Click on image to enlarge.
.jpg)
"Sean Dempsey and the Rare Auld Times" by Bernie Rosage Jr... 30x24" Oil on Gallery Wrapped Canvas
NOTE: Bernie is currently working on a series of paintings inspired from a recent trip to Ireland. The series is titled "Enchanting Ireland" and will be on exhibit in August 2009 at the Baysden Gallery in Jacksonville, NC and in September 2009 at the New Bern Artworks Gallery in New Bern, NC. Read about his adventures and see the progress of this series at Enchanting Ireland.
Friday, February 20, 2009
What the heck....?
Can you guess what the four white spots below are?
.jpg)
This extreme close up shows exactly how our minds can fill in the blanks and finish a painting for us. Impressionism is based on this theory... as our our minds eye mixes the colors and brings form to random shapes we can identify complex subjects with little input. Pretty cool huh?
Scroll down to see what these shapes represent and you can see the subject come to life.
This original oil painting by American Artist, Bernie Rosage Jr. is available for purchase... email Bernie with the title in the subject line... click HERE... for price and details...
Click on image to enlarge...
.jpg)
"The Bunratty Mill, County Clare Ireland"... 6x8" Oil on panel, alla prima with palette knife, 1-2009.
Did you guess four Irish sheep?
This painting, on a gessoed panel with painted sides, is easily framed or displayed with a decorative easel.
All my paintings are signed originals using artist grade oils and archival surfaces. "Certificate of Authenticity" included.
125/5/15
.jpg)
This extreme close up shows exactly how our minds can fill in the blanks and finish a painting for us. Impressionism is based on this theory... as our our minds eye mixes the colors and brings form to random shapes we can identify complex subjects with little input. Pretty cool huh?
Scroll down to see what these shapes represent and you can see the subject come to life.
This original oil painting by American Artist, Bernie Rosage Jr. is available for purchase... email Bernie with the title in the subject line... click HERE... for price and details...
Click on image to enlarge...
.jpg)
"The Bunratty Mill, County Clare Ireland"... 6x8" Oil on panel, alla prima with palette knife, 1-2009.
Did you guess four Irish sheep?
This painting, on a gessoed panel with painted sides, is easily framed or displayed with a decorative easel.
All my paintings are signed originals using artist grade oils and archival surfaces. "Certificate of Authenticity" included.
125/5/15
Thursday, February 05, 2009
"Pear # 9" by Bernie Rosage Jr.
“Pear #9”... w6.00" x h6.00" x d1.75", Oil on wood, alla prima from life, 2009.
.
.jpg)

.
This original oil painting by American Artist, Bernie Rosage Jr. is available for purchase... Email Bernie about purchasing details HERE... please include the paintings title in the subject line..
Click on image to see a larger view...
.
.jpg)
Pears are my favorite fruit to paint… just type in the word “pears” in the search box above if you don’t believe me. Two of my artist friends joined me in my studio to paint this small still life… a study in complementary colors. It was really cool to see each artists’ rendition of this lonely pear. All three renditions are pictured below...

This painting, on wood, is box-framed and ready to hang.
All my paintings are signed originals using artist grade oils and archival surfaces.
Thursday, January 29, 2009
"Solitude" by Bernie Rosage Jr.
"Solitude".... 8H x 6W x 1.75D" Oil on panel, alla prima, 1-2009.
SOLD @ New Bern Artworks and Company Gallery
Click on image to see a larger view...

Can't you just picture yourself enjoying the peaceful solitude of nature on a journey down this country lane? A lone tree at sunset is the focal point of solitude in this peaceful scene. I painted this scene from imagination from memories of the Irish landscape still fresh in my minds-eye from a trip there last summer.
This painting, on wood, is box-framed and ready to hang.
All my paintings are signed originals using artist grade oils and archival surfaces.
SOLD @ New Bern Artworks and Company Gallery
Click on image to see a larger view...

Can't you just picture yourself enjoying the peaceful solitude of nature on a journey down this country lane? A lone tree at sunset is the focal point of solitude in this peaceful scene. I painted this scene from imagination from memories of the Irish landscape still fresh in my minds-eye from a trip there last summer.
This painting, on wood, is box-framed and ready to hang.
All my paintings are signed originals using artist grade oils and archival surfaces.
Thursday, January 22, 2009
Fun in the Snow... Arctic Blast Continues!
No School... No Work... No Worries... Just fun in the snow!


Instead of plein air painting in the snow I opted for snowball fights with Livie... afterall... this may be the only snowfall we get while she is still a child. I can't even remember the last time we had snow on the ground... someone told me they thought it was 2004????

Livie and her miniature snow-woman. Joe Miller would be proud... She put a Cheap Joe's art hat on her Frosty the Snow-woman!
Friday, January 16, 2009
Arctic Blast paintings... Snow Scenes from the Blue Ridge
The United States has been hit hard this winter and finally the Arctic Blast (as it has been dubbed by our local TV forecasters) has hit Southeastern NC. Every morning I cut on my computer to look at local news, check emails, and see what's up with the weather. In fact, my opening page shows the temps for Jacksonville NC (where I live), Fleetwood NC (where our family mountain lodge is), and Oakland MD (where my wife is from)... this morning the temps read... Jacksonville @ 18 degrees, Fleetwood @ 0 degrees, and Oakland @ -9 degrees... BRRRRRRRRRR! I realize there are people throughout this great country who are laughing at my 18 degrees... the tables are turned in the summer when we get the 100+ temps and it doesn't bother us.
.
Here are a few "Arctic Blast" paintings I did last year. The scenes are set in the Blue Ridge Mountains near Boone, NC.
.
Click on paintings to enlarge...
.
These original oil paintings by American Artist, Bernie Rosage Jr. are available for purchase... Email Bernie about purchasing details HERE... please include the paintings title in the subject line.
.
Stay warm... thanks for dropping by... feel free to leave a comment and let me know what the temperature is in your area.
.
Bernie
.
PS... I have included Olivia's (my Lil' painting buddy) painting that she brought home from school today...
"Blizzard Snowman and Dog"... 9x12" Watercolor and Crayon by Olivia Rosage, age 7, 1-2009.
Wednesday, January 14, 2009
Vintage Camera "Hawkeye Brownie" by Bernie Rosage Jr.
"Hawkeye Brownie".... 8H x 8W x 1.75D" Oil on panel, alla prima from life, 1-2009.
.jpg)
This original oil painting by American Artist, Bernie Rosage Jr. is available for purchase... Email Bernie about purchasing details HERE... please include the paintings title in the subject line.
Click on image to see a larger view...
.jpg)
Anyone who has followed my work knows that I love to paint old vintage cameras. American nostalgia can not be better exemplified than by this painting I did from life of the famous Brownie, the name of a long-running and extremely popular series of simple and inexpensive cameras made by Kodak. The Brownie popularized low-cost photography and introduced the concept of the snapshot. The first Brownie, introduced in February, 1900, was a very basic cardboard box camera with a simple lens. With its simple controls and initial price of $1, it was intended to be a camera that anyone could afford and use. The camera was named after the popular cartoons created by Palmer Cox. The model I painted here is the Brownie Hawkeye Flash Model introduced in 1949 (1950 for the flash synchronized model). The original price was $5.50 and the flash was $7. It was discontinued in July 1961... one month before I was born.
Everyday objects painted from life is the essence of the "Painting a Day" art movement that is gaining momentum in the art collecting market.
.
This painting, on wood, is box-framed and ready to hang.
.
All my paintings are signed originals using artist grade oils and archival surfaces.
Thanks for dropping by...
Bernie
Subscribe to:
Posts (Atom)


.jpg)